Welcome to the Railroad Manager manual!
Railroad Manager 4.0 introduces lots of changes which are highlighted like this.
Introduction
This page has lots of tips in addition to the built-in tutorial. The first tip is: Play all the tutorials! This not only teaches you the basics of the game, but you also receive some diamonds for purchasing additional rolling stock. Unlike other games, in the Ludetis Railroad Manager (LRM) you do pay for locomotives, coaches and wagons with money earned in the game but with diamonds. This allows you to repeat missions later when you have more rolling stock and score more points and try different strategies!
The Maps
All maps in Railroad Manager consist of hexagons. This is well known from other strategy games like Civilization V. It allows us to create large maps which run even on basic handsets without wasting memory or battery charge. Also, building routes with your finger is much easier using hexagons.
The maps Riverland (fantasy) and North Germany (authentic) are available in the game as you download it. You can add more maps later for diamonds. Some maps include rolling stock or special missions which are not available on other maps. The rolling stock can be used on any map (from the first year of building).
We add new maps from time to time. Check out the wish list on this website!
Furthermore, beginning with level 5, you can use the procedural map generator to create maps.
Building Routes
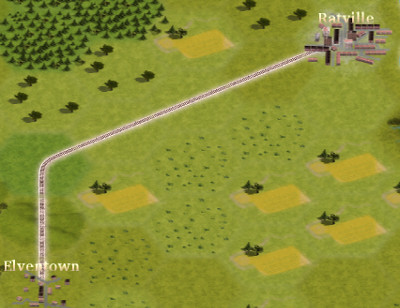
Maps have different types of landscape and each hexagon can come with existing features like forest or farm. This causes different building cost, which is displayed on the map. On oceans, mountains and lakes you cannot build any routes. To cross rivers, you need to research bridges. Compare these two routes in Riverland, both connecting Elventown and Ratville:
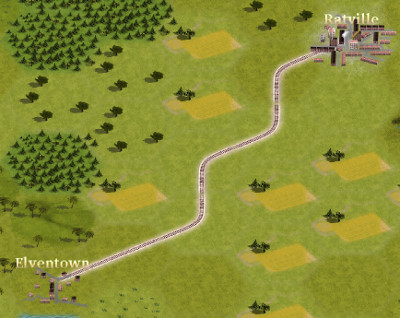
This version, which avoids the farms and hills (north of Elventown) costs $2390, the next one $2470 because forests and farms need to be removed. Both have the same length.
Proper route building saves you money, which you don’t have much of in the beginning. On some maps/missions this can make a difference, because you could connect an additional city if you save money on building tracks!
In both cases, you receive a $1000 bonus for connecting two villages. For each village you connect, you get another $500.
Starting with Railroad Manager 4.0, trains are slowed down in the hills unless you have the mountain trains science. In short missions where every $ and second counts, you’ll want to build around hills.
Did you know that there are two hidden maps, which only show up on seasonal holidays? On Halloween and around Christmas, look around for them! They are available for free, and you can unlock rare achievements on Google Play! Also they are funny 🙂
There is also a special Easter mission which then is available on all maps.
The One-Train Rule
On each single track route, only one train can travel at a time.
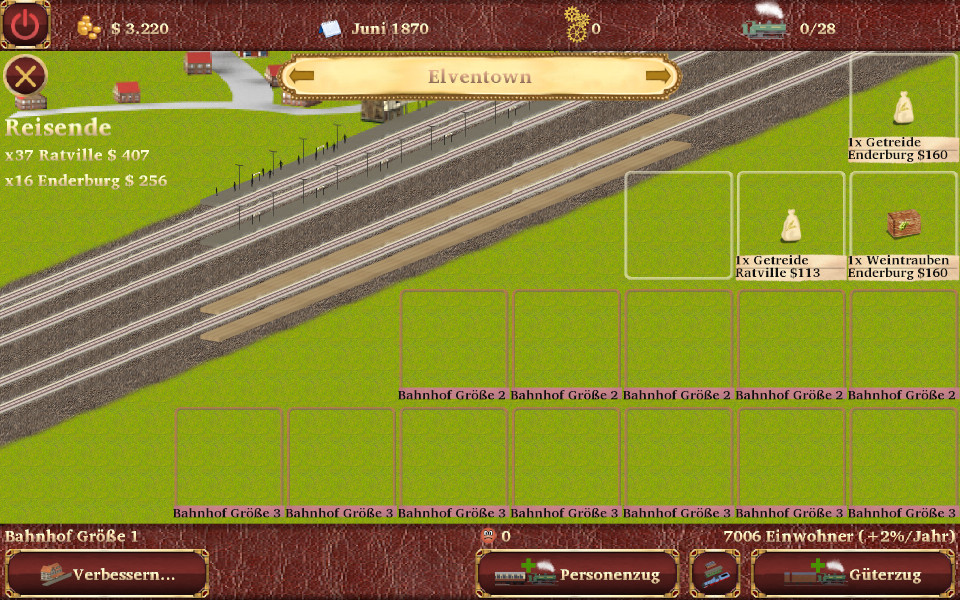
“Route” here means all connected hexacon tracks between two or more stations. It is easy to understand that there can only be one train between two stations on a single track route, like in the samples from Riverland shown above. But the rule also applies if more than two stations are connected with one single track route, shown here:
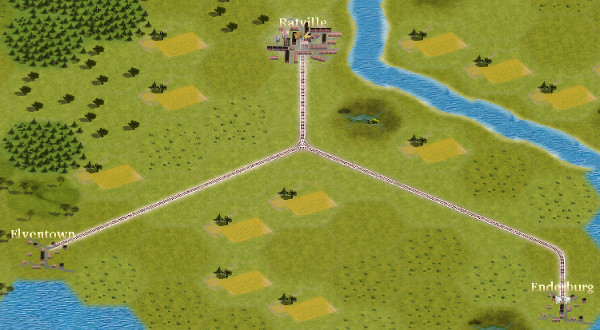
On this triangle route, only one train can travel at a time!
If a train travels from Elventown to Ratville currently, and another train wants to go from Enderburg to Ratville, the latter needs to wait on the station until the first reached its destination.
There are three options to solve this:
- Research Junction Stations and build a junction where the routes meet. This costs two months for collecting 5 science points (gears), $500 research cost and $500 building cost for the junction. As junctions are also useful to divide longer routes into two parts (Greathaven – Highercastle for example), this investment pays back in most scenarios.
- Research Double Tracks. Make the whole triangle double track. This is of course more expensive. Especially for short missions, it doesn’t pay back, and often you don’t have the money, and connecting more villages is more efficient.
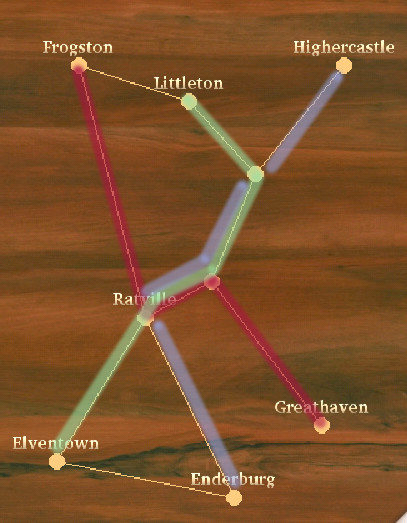
- Build in a different way, like so:
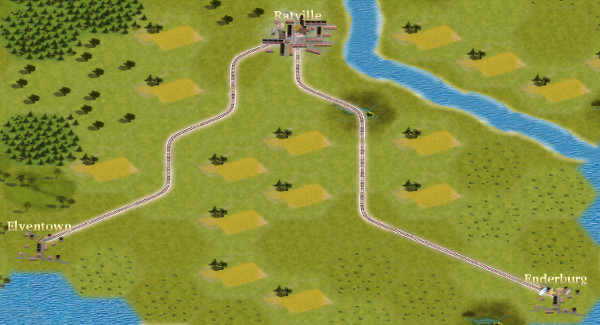
You can build both variants for your initial cash of $5000 in the “Manager” mission (first connect two villages, then leave building mode to collect the $1000 village connection bonus, then build the second connection). In the second variant, two trains can travel at the same time. Also, you need less rolling stock, because one commuter train from Elventown to Enderburg is sufficient to take all travellers to their destinations. More on optimized train lines you’ll find below.
Cargo, Villages and Stations
Your company earns money by selling tickets and transporting cargo. In contrast to other games (like the original Railroad Tycoon) you do not buy goods at one station to sell it at another with a margin, because that’s not what railroad companies actually do. A customer pays you to take his cargo from A to B. It depends on the distance and on the type of cargo how much you earn.
Not all villages spawn the all types of cargo. Some cargo shows up everywhere, but cargo for which you can charge higher transport fees not. So the most profitable cargo in Riverland is wine from Littleton. For wine, transport fees are twice as high as for example for the potatos from Ratville. Unfortunately you need a bridge to connect Littleton.
Some cargo is only produced by industries, which are new in Railroad Manager 4.0. This applies to all maps updated to 4.0 which is shown by the 4.0 mark on their frontpage image. Industries deliver cargo to adjacent hexagons. This means that cargo from industries next to villages shows up in that very village. Standalone industries must be connected using cargo stations to access their cargo. You can build cargo stations on or next to industries.
Very profitable special cargo sometimes shows up randomly in any village. Look out for presents (3x transport fee) or molybdenum (5x transport fee).
The larger a village, the more travellers it spawns, and the more travellers want to go there. The same is true for cargo. Furthermore this depends on happiness in villages. More on this later.
The size of the station defines:
- How many travellers can wait for trains at the same time (small stations 50, medium 500, large 5000)
- High loading and unloading times if there is more than one train in the station at the same time (medium stations more than three, large stations more than 10.
Often it’s feasible to build medium or large stations in bis villages where many trains travel to or from (passing trains to not increase loading or unloading times), for example Ratville in Riverland or Hamburg in North Germany. Avoid travellers who do not fit into the station because it is full.
For cargo there’s a new limitation starting with Railroad Manager 4: Stations of size 1 have a cargo capacity of 4 slots, size 2 9 slots, size 3 16 slots. This is shown by the color of the cargo slots on the stations’s screen.
The first red row is enabled once you extend the station to size 2 (you need the appropriate science to do this), the second red row once you make your station size 3.
Each slot takes a stack of identical cargo with the same destination, i.e. 2x grain for Enderburg or 8x grapes for Ratville.
That said, 2x Wood for Ratville and 2x Wood for Frogston would take two stacks and two slots.
If there’s no free storage, no cargo can be placed here. This applies for any cargo delivered here which is not directly used. So if you use the station as a hub or temporary storage, make sure there’s enough room. Otherwise, cargo could just vanish.
Cargo stations have a capacity of 16 and no upgrades.
Passenger trains
Especially when you have few locomotives, an efficient line layout is important: Using the least number of rolling stock possible, you want to connect as many villages as possible. In Riverland for example, three passenger train lines are enough to connect all villages, with Ratville as a central hub for changing passengers, like this:
Travellers are willing to change trains up to two times to reach their final destination. The three lines shown above connects all stations with a maximum of one change which is even faster. Of course Riverland is very small. On larger maps, it’s not that easy to fulfil all passenger’s wishes.
It’s a good idea to have a proper strategy from the start. For example, in North Germany, you could build your first route from Altona via Pinneberg to Itzehoe with one passenger train, and next a connection Altona – Norderstedt – Neumünster (second line), then Altona – Hamburg – Bad Oldesloe – Lübeck (third line). In this case, Altona is the central hub.
Of course you can change your line layout any time by withdrawing a train and set up a new connection.
On long routes, commuter trains need a long time because they stop often (and wait for opposite trains). If this happens, the number of travellers reaches the allowed maximum of 50 in larger villages. This often happens on the line Hamburg – Kiel. Here you should add an express train which does not stop on its way. Express trains have higher priority then other trains (except special trains). Travellers will prefer the express to Kiel even it they want to go further (to Rendsburg or Eckernförde for example). The faster you transport travellers, the earlier your train is ready to load even more travellers to earn more cash!
The fastest express train (from 1883) looks like this:

The two coaches the Cöln-Mindener loco can haul can transport a total of 84 passengers with a peak speed of 80 kph!
Compared to this, the same loco with two of the basic green fourwheelers can only travel at 55 kph with 65 passengers.
Your express trains become even faster in 1900 when the Bavarian CV becomes available. It can haul three Saxonian express coaches with 120 passengers at 90 kph.
Noch schneller wird es erst im Jahr 1900, wenn die Bayerische CV verfügbar ist, die 90 km/h fahren kann, wenn ihr sächsische D-Zug-Wagen anhängt. Starting 1920, you can have the Prussian ES15 which allows a peek speed of 110 kpf with the same coaches, but of course this needs overhead wire.
Cargo Stations
Railroad Manager 4 introduces the often wished cargo stations. They have two purposes:
- connect industries which are not connected by adjacent villages
- transport hub to collect cargo from different sources, and then build and send long trains to single destinations
Connected industries are shown with golden names, not connected industries show red names. Cargo produced by unconnected industries you cannot access.
For missions with heavy cargo traffic, use cargo stations as hubs. Bring any cargo there from nearby sources. Then build new trains with cargo for a single destination and send it there. This is very efficient, even taken into account that each underway unloading and loading of cargo costs 10 percent of its income.
Cargo stations require you to research the junctions technology. They work in the same way as junctions, so trains will wait there if the next route section is single track and currently in use. Cargo stations cost $750 while junctions cost $500.
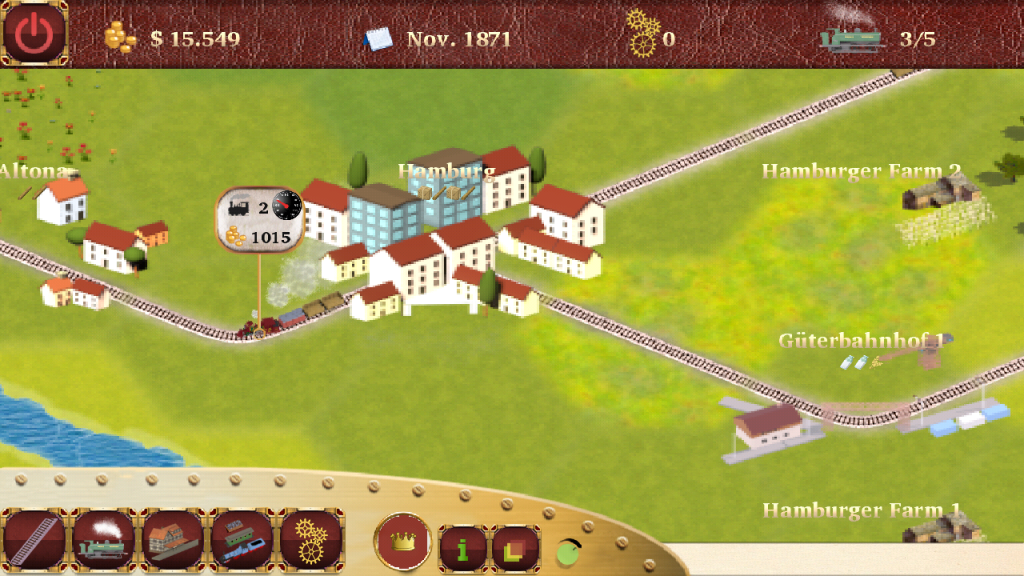
The above example shows a cargo station near Hamburg on the North Germany map. It not only connects the two farms to your network. It also allows you to send and collect cargo from different sources there without interfering with the passenger traffic in the Hamburg area.
Cargo stations are very important in many missions in that they connect interesting cargo and help to optimize your cargo traffic.
Loading Cargo Trains
You load and start cargo trains basically as follows:
- Open the stations list and look where the most cargo waits
- Open the station, tap the cargo train button
- Add as many cargo loads as possible with the same destination
- and start the train.
That’s not bad. But you can do better.
As the third tutorial mission points out, cargo is unloaded automatically on destinations along the line. You can use this to create long running cargo trains. This saves locomotives, waiting time at blocked routes (cargo trains have the lowest priority!) and upkeep cost (upkeep does not depend on the number of wagons).
For example, for the initial cash of the 10 minute mission in North Germany, you could connect villages as follows:
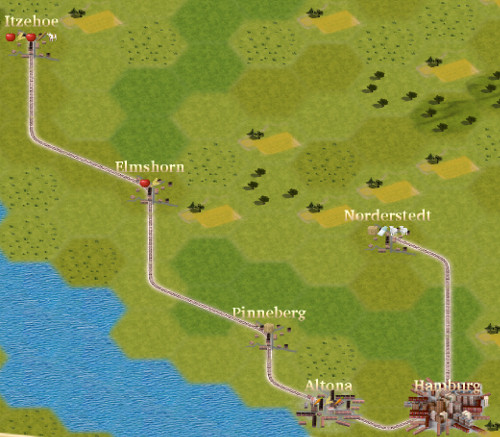
The advantage is, that all stations can be connected with one line!
In Itzehoe, just load everything onto a train and send it to Norderstedt or whichever the farest destination of cargo loads is. The train will stop automatically at each station for which it has cargo, uncouple the wagon and continue down the line. The same can be done for the opposite direction. Only at the intermediate stations you need to take care to load trains only with cargo for destinations in the same direction. The mini maps helps you with this.
That’s not all. Specialized cargo wagons help you to build efficient trains or to transport more load at the same time. Look at this example from Itzehoe:
The basic wagons only take 1 or 2 loads, so you would need 11 resp. 6 wagons to move all that stuff.
But, starting 1880, there is the cooling wagon:
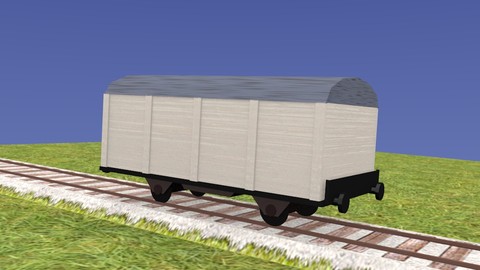
In this cheap wagon you can pack three units of milk (or vegetables, cheese, meat, fish). The game always uses the best available wagon automatically.
Here’s a list of all goods appearing in the game. Note that of course not all types of goods appear in all missions/maps.
![]() Apple
Apple
 Banana
 Beer
Beer
![]() Brick
Brick
 Cabbage
![]() Cargo
Cargo
 Carrot
 Car
Car
![]() Cheese
Cheese
![]() Chemics
Chemics
 Clothes
 Coal
Coal
![]() Coffee
Coffee
![]() Copper
Copper
![]() Corn
Corn
 Cows
Cows
 Diamonds
 Eastereggs
![]() Fish
Fish
 Furniture
![]() Garlic
Garlic
![]() Present
Present
![]() Grain
Grain
 Grapes
![]() Gravel
Gravel
 Iron
Iron
![]() Loam
Loam
 Mail
Mail
![]() Meat
Meat
![]() Milk
Milk
![]() Molybdenum
Molybdenum
 Oil
Oil
![]() Oranges
Oranges
 Pineapple
![]() Planks
Planks
![]() Potato
Potato
![]() Pumpkin
Pumpkin
![]() Rice
Rice
![]() Salt
Salt
 Scotch
 Sheep
Sheep
![]() Steel
Steel
![]() Straberry
Straberry
 Sugar
Sugar
 Sugarcane
![]() Tomato
Tomato
 Tools
Tools
 Toys
Toys
 Vodka
Vodka
 Wine
Wine
![]() Wood
Wood
 Xmastree
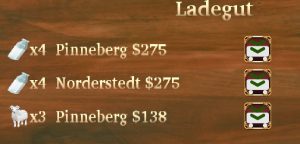
Two loads for different destinations cannot be loaded into the same wagon, so for the above example you would need four cooling wagons, of which only two would be full. But you can simply leave 1 milk for Pinneberg and 1 mild for Norderstedt there and add only two cooling wagons to your train, one for Pinneberg and one for Norderstedt. More milk will be spawned eventually to fill the next train efficiently.
The sheep fit into the cheap cattle wagon which is already available from 1842. You can even load 4 units of sheep or cattle into that wagon. As that wagon only costs 2 diamonds, it is a good idea to get one or two as soon as you can afford them. (Unfortunately the cattle wagon has a highest allowed speed of 55 kph, but most early cargo train locos aren’t that much faster).
Same applies for the flat wagon (for wood), the coal wagon and the tank wagon (which can also be used for wine and milk) and for the bulk wagons of different size. And for the beer wagon:
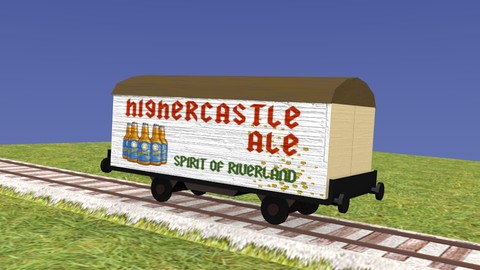
Beer from Highercastle is the spirit of Riverland! Cheers!
By the way, if you don’t move away cargo from a station, the senders will use different means of transportation, and the village stops spawning cargo.
Production
Especially Riverland does not spawn that many cargo with high transport fees. But you can stimulate production!
Each village or industry shows which production it can do. You need to deliver some kind of raw materials there, and the village or industry will produce more valuable goods which you can eventually transport in your cargo trains. This does not only double the cargo to transport, it also increases the amount of high transport fee cargo.
All maps have many production facilities, make use of them!
Technology
Use science points (gears) to unlock technologies which help you developing your railway company.
In each mission (except Tutorial 1) you can activate a number of engineers in the technology window (press the gears button). The maximum number of available engineers equals the number of connected villages. Each activated engineer produces 1 science point per month and costs $100.
The game deactivates engineers automatically if you don’t have the money.
Happiness
Only villages with happy inhabitants grow (yellow smiley).
Only content villages spawn suburbs.
The happier a village, the more travellers it spawns.
You can increase happiness in two ways:
- transport cargo there which makes happy (toys, presents, wine… those types of cargo show a smiley in the station window).
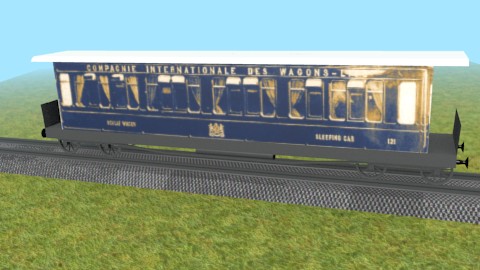
- take travellers there in a luxury coach. As of writing, the CIWL sleeping coach is the only luxury coach available:
In short missions, happiness is not that important, because it would take long until it makes a difference on your balance. In long missions, where you do not have capacity to transport all cargo, it’s feasible to transport cargo with smileys to unhappy destinations first.
Score and Level-up
For each solved mission you score points. Your total score is shown in the upper right close to the crown icon.
Whenever you reach 1000, 2000, 4000, 8000, 16000 … points, you reach the next level.
Whenever you reach a new level, you receive 10 diamonds for free!
Furthermore, each second level unlocks another wallpaper in the main menu (change the wallpaper artwork by swiping with your finger).
Mission scores depend on the mission objective. There are basically two types:
- Time-boxed missions. The score depends on your cash balance when the mission end date is reached.
- Missions with an objective like transport X passengers, goods, or connect all villages: The earlier you solve the mission, the more points you score.
The current mission score is shown in the info window (press the i button).
The missions “Manager” and “Turn of Century” show special tasks in the lower right of the screen from time to time. You score extra points by solving them as fast as possible.
If you found your own railway company (button in the upper right corner of the main screen), you can share your scores with the world. Use the toplists button to view your rank in any map/mission you played. Before you start a new mission, your rank and the top rank are shown on the screen.
More…?
Something missing? Suggestions? Use our feedback form!